Archive for February 2011

what tax refund?

the good news is that this year we actually get a tax refund, unlike last year when we ended up owing a bunch of money. after much debate, we decide to use our tax refund for something super fun and exciting (insert sarcasm) and buy a new washer and dryer.

our current washer and dryer came with the house. and they both work... kind of. the washer has some rust on the inside, so sometimes when doing laundry, you will find rust spots on your clothes. or, if you're lucky enough to make it through the wash cycle, it takes at least 2 full cycles in the dryer (or even 3 for large loads) before the clothes will be dry. and the dryer only likes to dry on high heat. so that means i have a huge amount of work clothes that i can't really put in the dryer. and both machines have actually ripped things before, we've lost a couple of sweatshirts, a few tank tops, and most recently, a new fitted sheet.

keep in mind that i write all of these things like i actually do laundry. but i can't lie, i don't really. mike does most of the laundry in our house. i blame it on the fact that i'm not coordinated enough to carry laundry baskets up and down the stairs (true) and that i'm afraid of the basement (only half true).

even though we were hoping to get a new fridge as our next appliance purchase, the washer/dryer quickly moved up on the list. we found a good deal at lowes over the weekend and decided to go for it. we went with a high efficiency top load washer and matching dryer. hopefully the new set will be much nicer on our clothes!
the best part is that lowes is offering free delivery right now so they can figure out how to get the new set into the basement. they will also be removing our old set and recycling it.

anyone else making any big purchases with their tax refund?

6 Comments

soft paws

i'm writing about this because i know that a lot of you also have dogs and thought that this information might be helpful to someone else. feel free to skip this post if you don't have pets :-)

sooo.... here's the thing. even though we're still not done installing the new hardwood floors (i know, i know... we're working on it, i promise!), we quickly realized that we had a bit of a situation. you see, even though i had super researched flooring options, the pre-finished floor that we picked ended up being no match for the nails of a 75 pound golden retriever.

the first couple of scratches were no big deal. honestly, it was kind of nice to get rid of some of the "newness" that came with the brand new floor. plus, i'm a big believer that a house is meant to be lived in. i had picked a low gloss floor and that helped to hide some of the scratches, at least they were not as noticable. but then we started to see some pretty big scratches... and i started to panic.

i started to research my options. some people just deal with it and refinish their floors every so often. this is not really an option for us - not only is that expensive, but we also installed a thinner hardwood floor (for cost and installation reasons) and it cannot be sanded/refinished very many times. i was looking for things that we could do now that would help to reduce the amount of scratches. the first thing we did was order another area rug for the entryway, move the runner to the hallway, and add a small rug by the backdoor. these were the big problem areas because these were the high traffic spots. this helped, but it is not enough. so i decided to try out soft paws. soft paws are basically vinyl caps that you glue on to the pet's nails. i know a few people that have soft paws for their cats, but i didn't realize that you could also get them for your dog. we ordered a box just to see if it would help. at the time, we had the 2 dogs and one box was enough for both dogs.

we received the soft paws a few days after reese passed away (it is these kind of things that are still so difficult). we went ahead and put a set on cooper. the application was easy enough, and he didn't really seem to notice them. they are supposed to last 4-6 weeks. it's been about a month since we first put them on cooper, and he's lost about half of them since the first application. we did have to remove 2 a few weeks ago because we had put them on too far and they were bothering him (he was trying to get them off). we went ahead and replaced the ones that fell off. i'm not sure that they will last the 4-6 weeks that the website says, but cooper is also pretty active so i wasn't that surprised that we had to replace some.

so far i have been very happy with the results. since we started with the soft paws about the same time we went from 2 dogs to 1, it's difficult to say if the reduction in scratches is just from the soft paws, but i haven't really noticed any new scratches. we went with the clear caps, and you can barely notice them on the dog. the only downside so far (and it's not even that much of a negative) is that they are loud - cooper "clicks" as he walks around the house.
DSC_0883

please focus on the dog and not on the amount of dog fur on the corner of the rug. gross...

DSC_0877
i was trying to take a picture of his paws so you could see what the soft paws would look like, but he wasn't sitting still. this is as best i could do. again, focus on the cute dog, not the dog fur covered rug...

so that's my review of the soft paws after one month. this is the point where i should probably write something about talking to your vet before putting soft paws on your pet... we've been happy with them and i plan on continuing to use them. if anyone else out there has any experience with soft paws or other solutions for the hardwood floor scratches, i'd love to hear your thoughts!

2 Comments

bathroom lighting take 2

why is it so difficult to find inexpensive but nicely designed lighting for bathrooms? i have been looking for months for a simple overhead light and a sconce that i like and can afford for our half bath - and i think that i finally found a good option! i was thinking that the fixtures seemed really familiar and then realized that it is the same combo that anna at door sixteen used in her downstairs bathroom.

i love love love anna's bathroom, so i was excited to see that she used the same fixtures. the only problem is that anna's bathroom is everything that mine is not - large with tall ceilings, has natural light, simple clean finishes and fixtures (matte black penny tiles on the floor!!!), the list could go on and on...

keep in mind that i am working with this:
DSC_0807
a few weeks ago i posted this material board, trying to put together a few of the things that we are working with.
half bath3 yeah, that light above is super expensive. even with my architect discount, still way out of my price range for just a single light. so to recap, we have a similar vanity, new white toilet, the faucet, and the hardwood floor. i'm still trying to talk mike into painting the walls a dark gray. i have the mirror pictured above (from ikea) but it will not fit in the space if we install a sconce beside the mirror. so i might be attempting to diy something similar... we'll see.
but back to the lighting - i found this:

it is the alabax surface light from school house electric.

paired with a truman sconce, also from school house electric.

i was instantly drawn to the alabax fixture in the black porcelain. i know that anna mixed finishes in her bathroom, using the black alabax fixture and the sconce in white porcelain. i think that my bathroom might be too small for that. but i can't decide which color i like better. for some reason i feel like the sconce should be white...

here is a picture of the alabax fixture in white:
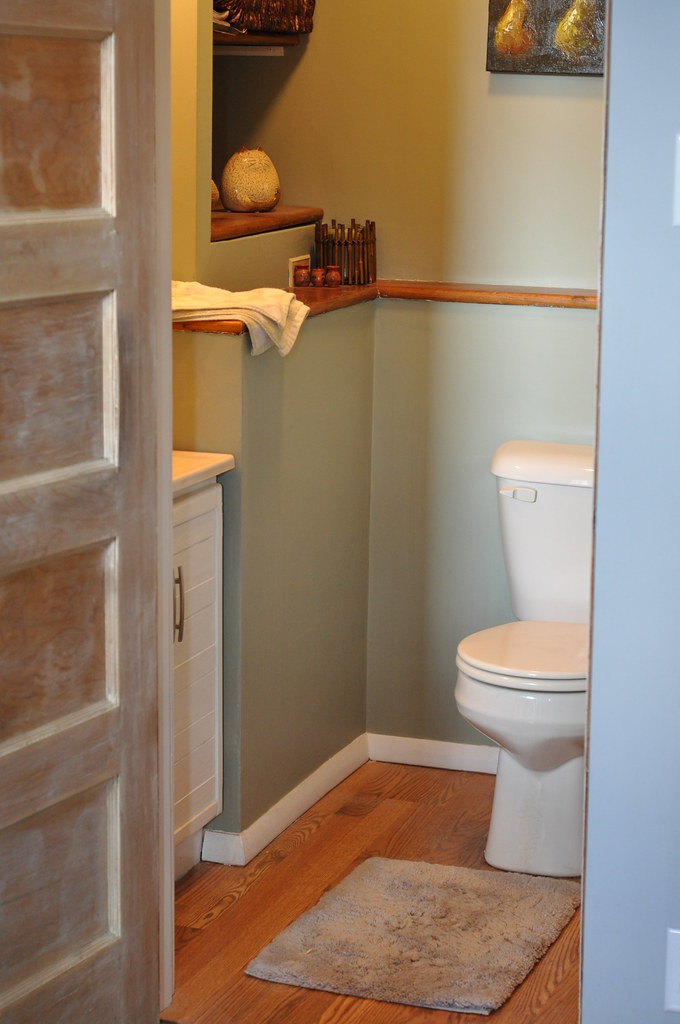
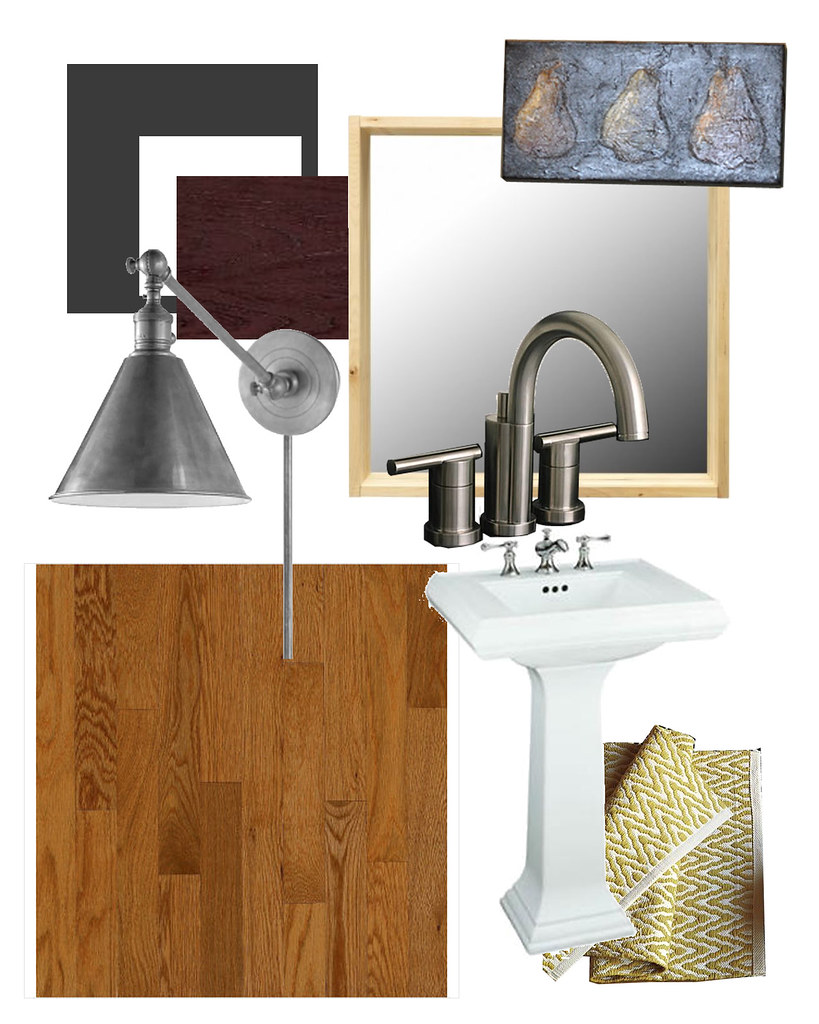
so my question to you - would you mix finishes? should i just get them both in white? the ceiling will be painted white and i'm not planing on having anything else black in the room. would the black fixture be too much for such a small space? it's just so pretty....

i gave myself the deadline of today to make a decision, because we need to patch drywall and finish up the floors asap. and in order to patch drywall, i need to know if we're installing a sconce or a light above the mirror... decisions decisions.

3 Comments

bathroom demo and a discovery!

first, thank you to all of you who left such kind comments on my last post, it really meant a lot to me. we're doing better, and cooper seems to be mostly back to his normal self.


we have actually been pretty busy the last few weeks, and i have several things i wanted to write about. most importantly, we are still making progress on the floors! i swear, this is the never ending project. it's funny that i thought we'd be done in only a few weeks when we started this before thanksgiving. 3 weeks... or 3 months... yeah...

the good news is that we're more than 1/2 way done with the kitchen floor. most of last weekend was spent on bathroom demo so that we can continue the new floor into the half bath, and then finish up with the kitchen floor. we're so close! well, close to being done with the floor, we will still need to put the bathroom back together. it's only been a few days but i really miss having a second bathroom already!
DSC_0863
the old toilet came out with no big issues (other than removing a toilet is just gross), but removing the sink took longer than anticipated. the water shut off knobs had been broken off so we had to do some unexpected plumbing work just to remove the sink. it only took one trip to lowes, so i consider that to be a success.

DSC_0864
but now we're all ready for the new sink!

in order to replace the valves, we had to remove a section of the drywall (you can see the middle section in the photo above) - and that meant i got to look inside of the wall! it's really sad how excited i get about looking into the wall, but i found a couple of interesting things. of course i took pictures!
DSC_0862
looking to the right, you can see that they just left most of the trim for the old stairs. the stairs used to split and go into the entryway and into the kitchen, we already knew that they had closed off the stairs to the kitchen to put in the half bath. we need those trim pieces for our front stair repair, but there's really no way of removing them without doing significant demo/damage to the bathroom. oh-well. i did pull out a piece of newspaper that was stuffed into the debris in the wall, fun fact, it looks like the bathroom was built in 1989.

DSC_0857
and this picture is looking to the left. it's difficult to tell what's going on, but the white in the middle is actually a tile wall in the kitchen. this is strange for several reasons - this means that they built a new wall in front of the original kitchen wall. we knew that there is a hidden window behind the fridge (that we are planning on uncovering at some point) but i didn't realize that the wall was built out too. and, based on some difficult measurements and math, i believe that the wall is actually a good 9" in front of the original kitchen wall. i have been working on the new kitchen layout for awhile now, and i could really use another 9" in width! i might need to move the fridge and do some more wall/window exploring at some point... just don't tell mike ;-)

and since i know that you all want a better look at the fantastic wallpaper, here ya go:
DSC_0859

5 Comments

search

Swedish Greys - a WordPress theme from Nordic Themepark. Converted by LiteThemes.com.