Archive for March 2010

schematic design: passed!

cause i'm sure you all are wondering, i got the letter in the mail yesterday - i passed the schematic design test for the architectural registration exam. i took the test only 3 weeks ago so i was surprised that i got the results so quickly. i was hoping to take the next exam this week but i don't think that is going to happen. between chicago, the wedding, and work i've had no time to study. maybe next week? it's exciting to know that i passed one, but then i just start to think about the 6 more i still need to take :-)

3 Comments

eureka springs: part 2

see part 1 here.

in undergrad, one of the buildings that we studied in our architecture classes and in studio was thorncrown chapel, designed by e. fay jones. i always loved the chapel and found it to be very inspirational. so i was very excited when my friend told me that she was actually going to get married in the chapel. (she was also studying architecture with me, did i mention that?).

DSC_0098

it was raining the day of the wedding, but the sun came out just in time for the ceremony.

DSC_0049

mike and i got there early so we were able to see the chapel and take a few photos before the other guests arrived.

DSC_0052

DSC_0051

DSC_0068

the wedding, and the location, was just beautiful.

DSC_0090

DSC_0083

congratulations melissa and matthew!!

3 Comments

eureka springs, arkansas: part 1

over the weekend mike and i attended a wedding in eureka springs, arkansas. we had never been to arkansas before, but luckily the wedding location was only about a 5.5 hour drive from st. louis. most of the other wedding guests (including the bride and groom) came from portland or boston.

DSC_0034

DSC_0007

we drove down on friday and after checking into our hotel (in bentonville, home of walmart) we drove over to eureka springs to walk around.

DSC_0002

most of the store were closed, but the weather was nice and we enjoyed walking along the streets.

DSC_0015

DSC_0009

DSC_0017

DSC_0039

i kind of wanted to stay at this hotel just so i could sit on one of these rocking chairs and look out at the hills.

DSC_0036

we had nice dinner in eureka springs and then drove back towards bentonville. we were able to meet up with everyone on friday night and spend time catching up. the bride was one of my housemates from undergrad and i hadn't seen her since my own wedding. we also got to see some other undergrad friends that i hadn't seen since graduation. stay tuned for photos from the wedding...

1 Comment

the last pink mini blind

remember this picture?
DSC_0042
i was so excited to show you the light fixture, and as soon as i posted the picture i was reminded, yet again, about the horrible pink mini blinds. it's not that i don't see them everyday, cause i do, but i think that i actually just hate them so much that i am able to tell myself they don't exist. but in picture form, on the blog, out there for the whole world to see? it's embarrassing. and i'd had enough.

while in chicago, we finally made it to ikea. and we bought replacement blinds. we installed them over the weekend and i love them. even though it was cloudy and rainy and gray yesterday, i'm posting this picture anyway.

DSC_0008

we went with the enje roller blinds from ikea after reading about them on door sixteen and brick house. both blogs raved about how nicely they filter the light and how easy they are to make a custom size. they come with nice hardware and seem to be good quality. and the price, can't forget the price. luckily, the largest blind size fit perfectly in our dining room window. i will take a better picture when it is sunny. i'm amazed how much of a difference this has made to our dining room. the blinds are not all that private at night when the lights are on inside, but we can close the curtains if we need to. with the living room in the back of the house, and the first floor of our house actually being up a half story, i don't think that this will be an issue for us. but is something to keep in mind if you are looking at these blinds for your own home.

we also went ahead and installed two more in the den.
DSC_0007
this smaller one fit perfectly (well, after some persuasion... in the form of a hammer). this window does not get much light, but it looks directly onto the neighbors house which is only maybe 4' away. and that window you see beyond is their bathroom window... their window is frosted so you can't see in, but i still feel better about installing the blinds. plus now it just looks like filtered light during the day instead of a brick wall.

the larger window in the den was more of an issue:
DSC_0006
cause why would it be the same size as the window downstairs and the same size as the blinds when it could be 1-5/8" narrower? it really was easy to customize though. the most difficult part was finding my fabric scissors. i didn't take photos, but here is a step-by-step guide to customizing the enje blinds for those who are interested:

step 1: measure the window and determine how much narrower you need the blinds to be. our blinds are actually longer than our windows but that isn't a big deal, we just won't unroll them all the way. the width is the problem. for us, we needed to cut off 1-5/8".

step 2: remove the cap on one end of the bottom rail. this will allow you to slide the rail off of the blind fabric. mark the amount you need to cut off and saw off with a hack saw. set aside.

step 3: carefully unroll the blinds and use a hack saw to cut the same dimension off of the top rail. the fabric will be glued to the rail at the top, i just cut through the fabric that was around the rail as i cut through the rail. make sure to cut on the non-finished end. (one end of the blinds has the hardware already attached, the other does not. use the end that does not have attached hardware)

step 4: carefully mark and cut the same dimension off of the fabric. for this step, i would recommend using fabric scissors. the blind fabric did not fray though. i just started rolling the fabric back onto the top rail, cutting as i went. this took the most amount of time.

step 5: slide the bottom rail back onto the bottom of the blind fabric and reattach the cap.

step 6: follow ikea directions for installation from this point on!

i really like how these blinds look in both rooms, i might buy a few more next time i'm at ikea. i also like how the white blinds look with the white radiators in both rooms. the blinds also come in a nice dark gray color that i was tempted by, but i'm glad i stuck with the white.

total project cost: $105 for all 3 blinds. not bad at all considering i was looking at a custom blind for the dining room window that was more than that amount for just one blind.

3 Comments

chicago

we went to chicago over the weekend for st patrick's day.
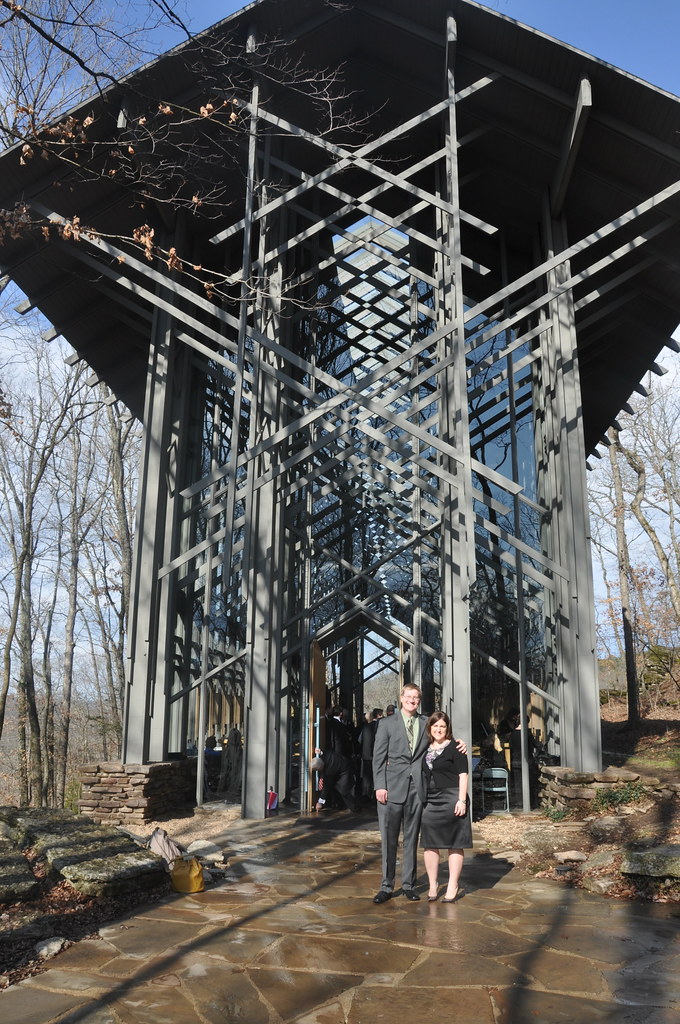
this is not my photo (thanks google), we did not see the green river this year. we had a great time with our friends and i miss them already!

anyone have big plans for the weekend? i think i'm coming down with a cold, so my plans are to get lots of sleep, maybe watch a movie or two, and do a couple of small house projects. if the weather stays nice and my cold goes away, i would like to go for a run outside. did i tell you that we signed up for a 5k in april?? yikes. i was doing really well with my running until i started working late every night. it's been a few weeks...

1 Comment

work perk

as you've probably picked up on, i work at an architecture firm. i think my official title is "architectural designer" but technically i am not allowed to us the word "architect" until i am actually licensed. this causes all sorts of problems and confusion when i try to tell people what i do for a living. for a little while i said i was an "architectural intern", but again, there's that word architect and i am not really an intern anymore. is it sad that one of my biggest motivators in becoming licensed is just so that i can actually give a title to what i do every day?

anyway, random... back to my work perk. right now i am working on a pretty large interior renovation project at work. because of this, we are getting a ton of samples of various interior finishes. at one point we were reviewing carpet tiles and ended up with a lot of extra tiles. i tried to give the rejected patterns back to the manufacturer because we do not have room to store them in our office... but they never picked them up. so after they sat at my desk for a couple of months i decided to take some of the samples home. the den needed some kind of rug and we somehow ended up with 4 samples each of 3 colors in the same pattern...

DSC_0004

i wasn't sure how to arrange them so i tried a couple different layouts

DSC_0005

trevi, of course, helped.

DSC_0007

i decided to go with this layout for now:

DSC_0006

i just put some masking tape on the back of the tiles to hold them all together. the animals loooove the new rug, they keep sleeping on it. they just like this room in general because it gets lots of sunshine during the day. plus it is where i study at night and for some reason all of the pets like to be near me. it's not what i was planning, but for free, it will certainly work for now.

4 Comments

1 down, hopefully only 6 to go...

sorry for the lack of posts lately, i've been working like crazy and studying in my few hours of free time. i took my first ARE (architectural registration exam) yesterday morning. for those of you who are familiar with the exam, i decided to take the schematic design test first. there are 2 graphic vignettes on the schematic exam. i think i did fine on the interior layout portion, but the building layout portion i am unsure of. i kind of ran out of time. i completed it, but didn't have much time to check over the layout or clean it up. looking back, i know that there are a couple of things that i could have done better. i think that if a person was grading the vignette i'd be fine, i just don't know how the computer will grade. i guess i'll have to wait and see when i get the results in a couple of months.

5 Comments

dining room light: part 2

now that you've seen our materials list, this post will be about how we actually made the fixture.

step 1: we took down the old fixture. as i've mentioned before, we still have some knob and tube wiring in our house, mostly with overhead lights. some of our lights were also (electric) lights hanging from old gas lines (assuming we used to have gas lights). we found a handy ceiling fixture kit from home depot that happened to have a connector piece that screwed into the gas line pipe. much easier than what we used for our living room fixture. and before you all start to freak out that we're hanging lights from gas lines - this was how the old fixture was installed and was much heavier than our new fixture.
DSC_0026
we also touched up the ceiling paint since our new canopy is slightly smaller than the old canopy.

step 2: we attached the yarn/string to the glass globes. to do this i cut pieces of wire in about 6" lengths and wrapped the center around a stick to make a loop. i then tightened the loop to be slightly smaller than the small hole that was in the glass globe, and trimmed the length of the wire to be slightly less than the diameter of the globe.
DSC_0001

DSC_0002
next, i cut the cotton string in 6' lengths. we had measured the ceiling height and after deciding we wanted the fixture to hang approx. 30" from the table, i knew that the strings needed to be about 4.5' - i just added in some extra to make sure i had enough string to knot.
DSC_0003
then, using mike's boy scout knot-tying skills, we knotted the string through the loop in the wire. after the string was attached to the wire, we simply inserted the wire into the hole in the glass globe, pulled on the string so that the wire/string was centered in the globe, and then gently pulled again to bend the wire slightly so that it conformed to the curve of the globe.
DSC_0007
simple solution, plus the wire reminded me of the inside of a light bulb. we did that 21 times.
DSC_0010

step 3: we needed to straighten the cords for the lights.
DSC_0018
the one on the right has been straightened, the one of the left has not. so how did we straighten them? by putting the cords in super hot water and then stretching. maybe this is the part where i should start adding "do not attempt this at home" - the cords were not plugged in and we made sure not to put the socket in the water. just the actual cord for a few seconds to soften the plastic enough that we could straighten it.
DSC_0019
DSC_0020
mike really likes it when i put his picture on the blog :-) kidding...

all 3 cords, straight:
DSC_0023

step 4: next we had to add 2 holes to our lid (canopy) so that we could attach it to the ceiling, and enlarge the center hole for the cords and string. for the smaller holes we just used the drill, but for the larger center hole we had to use the grinder attachment on the dremel. we made the center hole the same diameter as the steel extender that we bought from lowes. sorry i don't have a picture of that, but it's basically a 1.5" steel tube that we used to have a more finished look at the ceiling.
DSC_0028

step 5: start to put it all together. we decided to hang everything from the ladder so that we could assemble it all without having to hold it up the entire time. we measured out our desired end length of the fixture, which ended up being 10" above the floor when hanging from the ladder.
DSC_0032
we used a couple of scrap pieces of wood and some clamps so that we could just slide everything out once it was assembled. you can see the steel extender in the picture below, we used some tape on the back side to hold it in place when working. once installed, the tension from the cords kept it from moving. we started with the light cords:
DSC_0033
and then used a large needle to string the glass globes through. we tied each string onto the ladder to keep everything in place.
DSC_0035
after the 3 cords and all of the string, everything was fitting super tight and tension was keeping everything in place. this made it easy to make height adjustments. at this point we quickly realized that the globes and lights were going to shift around so we just tried to keep everything at approx. the same height. not the time for perfection.
DSC_0040
can you tell that we were worried that something would fall and break?? we also kept the light bulbs in at this point to make sure that they would be the correct height.

step 6: the wiring. now we had our 3 cords ready for wiring. we removed the outer plastic on the cords and got everything ready. all of the connections were actually made with the wires up at the ceiling.
DSC_0041
while not super heavy, it was easiest for us to support all of the glass globes independently from the rest of the fixture. we installed a hook up in the ceiling, knotted all of the strings together, and used the hook to hang the globes. this allowed us to make all of our wire connections and connect the canopy without having to hold up the entire fixture.

step 7: install a dimmer switch. this was just as easy as installing a normal light switch. we wanted this fixture on a dimmer because our house is so open, it's nice to have a bright fixture for everyday use, but we wanted to have the option of dimming it for dinners, etc.
DSC_0046

step 8: celebrate being done!! yay!

DSC_0054

8 Comments

dining room light: part 1

blog friends - sorry for the delay in the dining room light description, i promise i didn't forget, work has just kept me busy lately and i've also finally started studying for the AREs. i already miss my free time :-)


but back to the dining room light. this is going to be a long... i think i'm going to break it up into 2 posts. i started thinking about making a fixture something similar to this, only with light bulbs, about a year ago. then i saw this post on door sixteen and started to rethink my plan... i really liked the look of the globes, esp. when combined with round light bulbs. using the tutorials that anna posted, i came up with a basic design.

first step was to find the glass globes. one of the tutorials recommended cb2, so when we were in chicago last spring, we went to cb2 and bought 21 bubble balls:

why 21? i don't really remember my logic at the time, but i bet it has something to do with the fact that i was planning on using 3 actual light fixtures. or maybe they only had 21. either way, we've had 21 of these things sitting in our basement for a year. and somehow we managed to not break a single one. success!

next up, the actual light fixture/cord kits. we looked at home depot, lowes, ikea, and even a lighting store and didn't have much luck. eventually we found white cord kits at pier one - nothing was wrong with them but the cords looked more like extension cords and i wasn't crazy about that. finally we found a cord kit at urban outfitters that had a nice smooth cord. we bought 3.
DSC_0017

the hardest part was finding something for the ceiling canopy. do you know how difficult it is to find a modern looking ceiling canopy?? after looking everywhere, we finally found this:
DSC_0015
and when you take it apart, you are left with this:
DSC_0024
the perfect modern ceiling canopy! some of the other materials we used:

ceiling light kit
22 gauge wire
white cotton yarn/string
steel extender piece
screws
hook
electrical tape
3 g30, 60 watt light bulbs
dimmer switch

up next, step by step instructions...

Leave a comment

search

Swedish Greys - a WordPress theme from Nordic Themepark. Converted by LiteThemes.com.